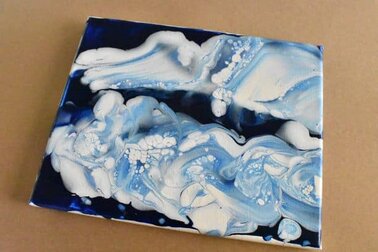
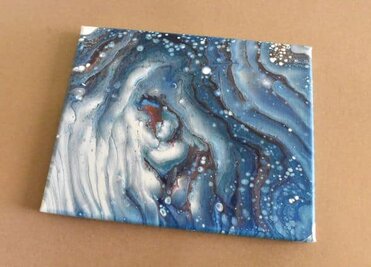
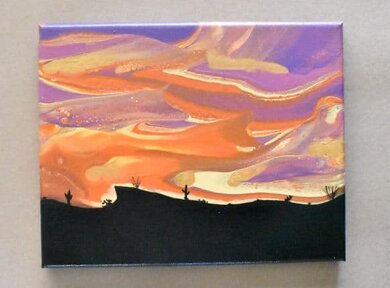
Who doesn’t love clouds? They’re so fluffy and delicate and just a lovely addition to any sky, including the skies in your paintings! So this post delves into how to paint clouds with acrylic pouring!

Now, they’re not the most realistic clouds in the world, but if you’re looking more for abstract, fun, easy clouds to paint (even for beginners!), then this is the perfect technique for you!

In this post, I will cover the cloud pour painting technique, which is what inspired my thoughts about how to paint clouds with acrylic pouring, as well as how to take the concept of that and apply it to some fun clouds for your next painting.
If you’re pouring for the first time and would like more explanation on materials, processes, and terms, you can head on over to my Beginner’s Guide to Acrylic Pouring. You can also head over to my Comprehensive Guide to Acrylic Pouring Techniques for more information on all of the different techniques and my How to Thin Acrylic Paint for Acrylic Pouring post to learn all about pouring mediums!
Cloud Pour Painting
What is a cloud pour?
A cloud pour is a pour where you get fluffy cells (usually of white) that look like clouds! This is achieved by adding in a satin enamel (Decoart Americana Satin Enamel is a popular choice) OR I experimented and found that you this technique also works with interior house paint as well, which many of us have on hand!
This post contains affiliate links, which I earn a small comission from. These are provided for your convenience, and the price isn’t increased at all.
What materials do you need for a cloud pour?
Paints:
- Artist’s Loft Copper
- Artist’s Loft Old Gold
- Artist’s Loft Metallic Cobalt
- Liquitex Basics Quinacridone Magenta
- Master’s Touch Titanium White
- Master’s Touch Crimson
- Master’s Touch Titanium White
- Master’s Touch Pthalocyanine Blue
- Dunn-Edwards Faded Gray
All of my colors were mixed from the paints above. If you want to learn how to mix colors, be sure to grab your free color wheel printables and snag the helpful printable pack as well.
Pouring Medium:
- Floetrol
- Water
Tools:
Canvas:
Cloud Pour Video
Cloud Pour Step by Step
- Lay down a thin coat of background paint. I used a thin coat of white paint.
- Layer your pouring cup with your different colors of paint as you would with a tree ring pour, pouring slowly down the side of the cup so that you have discrete layers of color (The order in which I layered my cup was copper, gold, magenta, pthalo blue, white, pink, cobalt, copper, and gold.). For your last layer, use your satin enamel or interior house paint.
- Pour the paint onto the canvas moving the paint in small circles.
- Tilt the canvas in a circular manner until the rings are stretched and the canvas is covered to your liking.
How to Paint Clouds
So how do you take what we know from cloud pour painting and paint clouds with acrylic pouring? Well, the technique that I used was:
- Swipe Technique
What colors do you need to paint clouds?
We all know that clouds are typically going to be white, BUT really there are so many different options when you are thinking about how you want the clouds to look in your paintings.
For instance, are they storm clouds, dark and ominous? Are they pink clouds in a sunset? Are they clouds at night illuminated by the moon? See? So many options.
If you take a look at my sunset painting, you can see a whispy element to it, which is often caused by clouds on the horizon.
(If you’re curious about colors and color theory as it relates to acrylic pouring, head on over to my post about Choosing Colors for Acrylic Pouring and grab your FREE printable Color Wheel and Color Scheme Guides below!)
Materials You Will Need to do a Cloud Painting or Add Clouds to Your Painting
Paints:
- Master’s Touch Titanium White
- Master’s Touch Pthalocyanine Blue
- Dunn-Edwards Faded Gray
Pouring Medium:
- Floetrol
- Water
Tools:
Canvas:
How to Paint Clouds Video Tutorial
Step-by-step Cloud Painting with Acrylic Pouring
Cirrus Clouds (Whispy)
- Lay down a layer of the color that you’ll be using for the sky.
- Pour a line of white or whatever color you want your clouds to be.
- Then pour a line of your satin enamel or interior house paint below that first line of paint. I used gray because I thought it would add some nice shaddowing as well as the cloudy cells.
- Using a long palette knife, drag the two lines of paint upward in a sweeping motion. Continue in this manner all the way along the lines of paint that you laid down.
Cumulus Clouds (Fluffy)
- For fluffy clouds, you still want to start with a layer of your sky color.
- Then lay down puddles of the color you want your clouds to be (white in my case).
- Within each of those puddles, lay down a smaller puddle of your satin enamel or interior house paint.
- Using a shorter palette knife, draw your puddles out in small, circluar motions, moving all the way around each puddle.
- With the tip of your palette knife, draw in any defining features that you want in your clouds, such as swirls or fluffy mounds.
Go Forth and Pour!
And there you have it, now you know how to paint clouds using acrylic pouring! Super easy, right! If you’re interested in painting the sky, you might like my moon painting, space painting, and sunset painting tutorials!
As always, check out my updates on Facebook and Instagram and feel free to peruse Homebody Hall for more fluid art tips, tricks, and tutorials! Also head over to Youtube and subscribe to get my videos sent to you as soon as they come out!!
And now you can joing my Facebook Group, Flourishing Fluid Arts with Homebody Hall and get help, tips, inspiration and just hang out and have a great time!
2024 Color Palettes for Creating Updated Art
Let’s Throw a Paint Party: How to Host Your Own Paint and Sip
Do It Yourself Countertop Paint: Update Your Kitchen With Pour Paint
Want to remember this tutorial on how to paint clouds with acrylic pour painting? Pin this tutorial to your favorite Pinterest Board!


