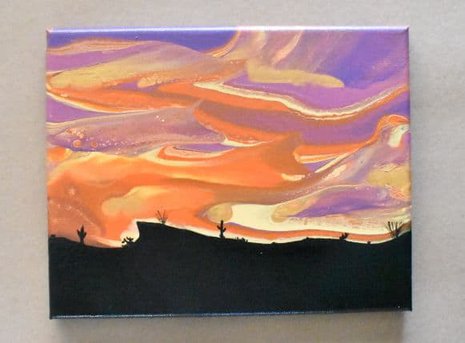
One of my favorite parts of living in the rural desert is the sunsets, and I wanted to share this beauty with you by teaching you how to paint a sunset painting with acrylic pouring. This sunset painting tutorial will walk you through step by step how to easily paint a beautiful, colorful sunset with acrylics on canvas, even as a beginner!

If you’re pouring for the first time and would like more explanation on materials, processes, and terms, you can head on over to my Beginner’s Guide to Acrylic Pouring. You can also head over to my Comprehensive Guide to Acrylic Pouring Techniques for more information on all of the different techniques and my How to Thin Acrylic Paint for Acrylic Pouring post to learn all about pouring mediums!
So how do you paint a sunset painting with acrylic pouring? Well, the three techniques that I used were:
- Dirty-cup Pouring
- Swipe Technique
- Hand-painting
What colors do you need to paint a sunset painting?
Sunsets are amazing because they can be a whole host of different colors, from pink to purple, oranges, reds. They really are nature’s painting. So when you’re working on your sunset painting, there’s really no limt to what you can do colorwise.
You can add in blue if you’re working on the beginning stages of a sunset sky or darker colors if you’re working on the end of the sunset, more towards dusk.
For this sunset painting, I chose to use purples, some pink, oranges, and some copper and gold to play with the light, since it is a sunset after all.
(If you’re curious about colors and color theory as it relates to acrylic pouring, head on over to my post about Choosing Colors for Acrylic Pouring and grab your FREE printable Color Wheel and Color Scheme Guides below!)
Materials You Will Need to Paint a Sunset Painting with Acrylic Pouring
This post contains affiliate links, which I earn a small comission from. These are provided for your convenience, and the price isn’t increased at all.
Paints:
- Artist’s Loft Copper
- Artist’s Loft Old Gold
- Liquitex Basics Quinacridone Magenta
- Master’s Touch Crimson
- Master’s Touch Yellow Med
- Master’s Touch Permanent Black
- Master’s Touch Titanium White
All of my colors were mixed from the paints above. If you want to learn how to mix colors, be sure to grab your free color wheel printables and snag the helpful printable pack as well.
Pouring Medium:
- Floetrol
- Water
Tools:
- Paintbrushes
- Paper plate/ Palette
- Palette Knife
Canvas:
How to Paint a Sunset Video Tutorial
Step-by-step Sunset Painting with Acrylic Pouring
Paint the Foreground
The first thing that you need to do when you’re painting a sunset painting is lay down a foreground. I chose to use black because I wanted a silhouette look for this painting, and I think the black makes the colors of the sunset stand out.
I recommend making the foreground of your painting about 1/3 of your canvas. This just is a really pleasing proportion for artwork.
Don’t worry too much about the shape, this will probably change anyway when you’re tilting, and you can always go back in with a brush to touch this up.
Open-cup Pour
I layered the darker colors toward the bottom of the cup, namely the purple color, so that the darker purple would end up at the top of the painting, furthest away from the horizon.
Other than that, I just layered them in a way that I thought looked nice. I really just wanted to figure out how to paint a pretty pink sunset. So Ihe order that I put the paints in my cup was: violet, red-violet, orange, copper, yellow-orange, violet, red-violet, orange, yellow-orange, copper, red-violet, copper.
- Layer your paints into your pouring cup by pouring them in slowly, as you would for a tree ring pour. This will enhance the ribbon-like quality and keep the colors from muddling.
- Pour your paint in stripes across the canvas parallel to the horizon, working your way up to the top, going back and forth.
- Tilt the painting until you’re happy with the distribution of colors.
Swipe
Here’s where we get to that whispy effect of sunsets that I just love and that I think makes them really magical looking.
- Take a color that you’d like to work into your sunset (I used gold to play with the light) and add small thin lines of this color around your sunset sky.
- Using your pallete knife, gently swipe this color into your other colors with flowing, wavy motions.
- Continue on with this process until you are happy with how your sunset painting looks.
Hand-painting
The hand-painting on your sunset painting really is what takes this painting to the next level. You could paint whatever type of scene you’d like, whether you’d like to make it a beach scene and add the ocean and a palm tree, some mountains and trees, buildings, clouds seriously, anything that makes you happy!
For this one, I decided to model it after the landscape that I know the best and love the most, the desert. So there’s some different types of cactus and a little bit of rockiness. I kept it pretty simple though because I wanted the sunset to be the star of the show here.
Don’t forget that when you’re doing your hand-painting, if you mess up or don’t like where something is placed, you can take a wet paper towel or a baby wipe and remove it before it dries!
Go Forth and Pour!
And that’s how you paint a beautiful sunset! Now go on and give it a shot yourself, and have some fun with it! You might also be interested in my ocean sunset project as well if you’re interested in how to paint a sunset over water!
As always, check out my updates on Facebook and Instagram and feel free to peruse Homebody Hall for more fluid art tips, tricks, and tutorials! Also head over to Youtube and subscribe to get my videos sent to you as soon as they come out!!
2024 Color Palettes for Creating Updated Art
Let’s Throw a Paint Party: How to Host Your Own Paint and Sip
Do It Yourself Countertop Paint: Update Your Kitchen With Pour Paint
Want to remember this sunset acrylic pour painting? Pin this tutorial to your favorite Pinterest Board!


