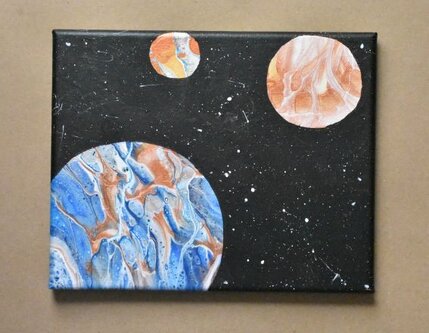
Sometimes you just need to get out of town, and sometimes you just need to get off the planet, know what I mean? So in this tutorial, I am here to help you by teaching you step by step how to make an acrylic pouring space painting that anyone can do!

If you’re pouring for the first time and would like more explanation on materials, processes, and terms, you can head on over to my Beginner’s Guide to Acrylic Pouring. You can also head over to my Comprehensive Guide to Acrylic Pouring Techniques for more information on all of the different techniques and my How to Thin Acrylic Paint for Acrylic Pouring post to learn all about pouring mediums!
So how do you paint a space painting with acrylic pouring? Well, the two techniques that I used were:
- Infinity Pour
- Hand-painting
What colors do you need to paint a space painting?
Because things can be really dark out there in space, I chose to use metallics to bring some light and sheen to the painting. But as with all art, inlcuding acrylic pouring, you can do what ever you want! Use your imagination! If you’re trying to make a space painting with specific paintings, you’ll want to use those planets as reference when you’re choosing paint colors.
(If you’re curious about colors and color theory as it relates to acrylic pouring, head on over to my post about Choosing Colors for Acrylic Pouring and grab your FREE printable Color Wheel and Color Scheme Guides below!)
Materials You Will Need to Paint a Space Painting with Acrylic Pouring
This post contains affiliate links, which I earn a small comission from. These are provided for your convenience, and the price isn’t increased at all.
Paints:
- Artist’s Loft Mars Black
- Artist’s Loft Titanium White
- Artist’s Loft Metallic Cobalt
- Artist’s Loft Old Gold
- Artist’s Loft Brilliant Blue
- DecoArt Dazzling Metallics Shimmering Silver
Pouring Medium:
- Floetrol
- Water
Tools:
- Paintbrushes
- Paper plate/ Palette
- Pencil/ Sharpie
- Round things, such as lids and containers, or a compass
Canvas:
Step-by-step Space Painting with Acrylic Pouring
Do Your Underlying Acrylic Pour
The planets will be made up of your acrylic pour. I chose to do an infinity pour so that I would have one side with warm colors and one side with cool colors with both incorporated in the middle. I wanted this so that I could do multiple planets or moons with different colors and patterns in them.
However, you could choose nearly any acrylic pouring technique that you wanted depending on the look you were going for with your planets.
Infinity Pour
- You’ll need two cups of pouring paint for this technique. I used warm colors in one cup and cool colors in the other with white in both. I also played on the complementary nature of orange and blue with the copper and blues. My cups were layered as such:
- Cool: white, silver, blue, metallic cobalt, white, silver, blue, metallic cobalt
- Warm: white, copper, gold, white, copper, gold, white
- Pouring the paint onto your canvas, moving your hands in circles, overlapping the paint from each cup into the other’s puddle.
- Tilt and stretch your paint across the canvas until your happy with the way that your painting looks.
NOTE: I used a more diagonal composition for this pour, but you can choose to do it any way that you want.
Add in Your Planets
You can freehand, find some round things around your house, or use a compass from your geometry days, but you’ll need to put some circles on for your planets. On the light colors, I was able to get away with tracing cirlces in penil, but on the darker colors, I needed to use a Sharpie.
For composition, I would recommend that you choose one planet to be your focal point, probably the largest one. Put it somewhere that is not the center. Then add two more planets in other smaller sizes. Three objects tends to be pleasing to the eye.
Finish It Off with Space
With a flat paintbrush, fill in the black outerspace around the circles you sketched out for the planets.
Incorporate Some Stars
Cover up your planets, either with paper or the lids and containers you used to trace them, as I did, and create some stars on the canvas by flicking a paintbrush with white paint on it.
Go Forth and Pour!
There you have it! Your very own easy stellar DIY acrylic pouring space painting on canvas! If you’re into the space theme, be sure to check out my moon painting tutorial and my galaxy painting tutorial!
As always, check out my updates on Facebook and Instagram and feel free to peruse Homebody Hall for more fluid art tips, tricks, and tutorials! Also head over to Youtube and subscribe to get my videos sent to you as soon as they come out!!
2024 Color Palettes for Creating Updated Art
Let’s Throw a Paint Party: How to Host Your Own Paint and Sip
Do It Yourself Countertop Paint: Update Your Kitchen With Pour Paint
Want to remember this space acrylic pour painting? Pin this tutorial to your favorite Pinterest Board!


