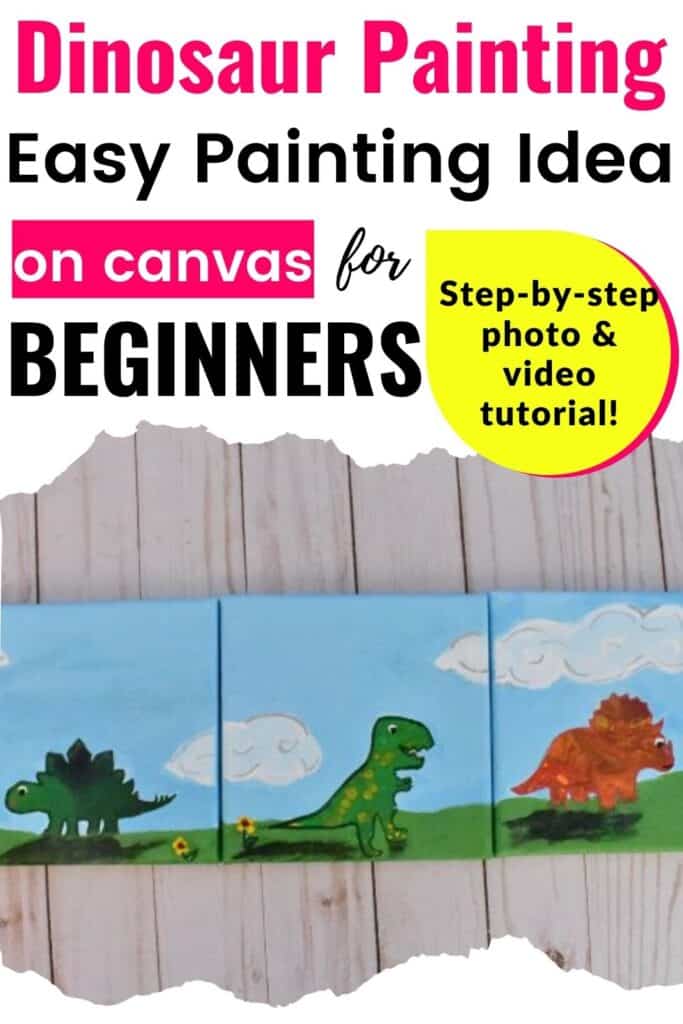
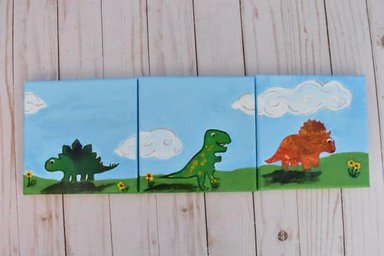
Dinosaurs are such intriguing creatures, probably because they went extinct and much is left to our imaginations, but it’s also probably because we do have evidence of them and know that they were here. Since so many kids in particular fall in love with dinosaurs, I decided to do a dinosaur painting in a more whimsical style that would work really well in a space for kids. Follow along to create an easy and simple dino painting for your youngsters!
If you’re pouring for the first time and would like more explanation on materials, processes, and terms, you can head on over to my Beginner’s Guide to Acrylic Pouring. You can also head over to my Comprehensive Guide to Acrylic Pouring Techniques for more information on all of the different techniques and my How to Thin Acrylic Paint for Acrylic Pouring post to learn all about pouring mediums!
So how do you paint a dinosaur painting with acrylic pouring? Well, the two techniques that I used were:
- Flip-cup Pours
- Hand-painting
What colors do you need to paint a dinosaur painting?
When we’re thinking about colors for painting dinosaurs, I feel like you can truly take it anywhere you want because we don’t really know what colors they were. I mean, realistically, they were probably similar to lizards, which vary wildly in their colors based upon their habitat.
For this painting, I chose to go bright and fun because my vision for these paintings was something more of an illustration that could be hung as art in a kid’s room/baby’s nursery.
I used a variety of colors and tried to make the three paintings in the tryptic cohesive by using keeping a common color between the paintings. So I used green in a couple of them and yellow in a couple of them so that they still looked like they belonged together.
(If you’re curious about colors and color theory as it relates to acrylic pouring, head on over to my post about Choosing Colors for Acrylic Pouring and grab your FREE printable Color Wheel and Color Scheme Guides below!)
Materials You Will Need to Paint a Dinosaur Painting with Acrylic Pouring
This post contains affiliate links, which I earn a small comission from. These are provided for your convenience, and the price isn’t increased at all.
Paints:
- Master’s Touch Crimson
- Artist’s Loft Neon Green
- Artist’s Loft Neon Blue
- Artist’s Loft Neon Orange
- Master’s Touch Yellow Med
- Artist’s Loft Brilliant Blue
- Master’s Touch Phthalocyanine
- Golden Acrylic Gesso
All of my colors were mixed from the paints above. If you want to learn how to mix colors, be sure to grab your free color wheel printables and snag the helpful printable pack as well.
Pouring Medium:
- Floetrol
- Water
Tools:
- Baby dinosaur templates – this set included a ton of different dinosaurs, like triceratops, stegosaurus, raptor, t-rex, even one coming out of an egg!
- Paintbrushes
- Craftsmart Paint Markers
- Palette knife
Canvas:
- Three 6×6-inch canvases
How to Paint a Dinosaur Painting Video Tutorial
Step-by-step Dinosaur Painting with Acrylic Pouring
Dinosaur Coloration – Flip-cup Pour


The foundation for this project is the pour that creates the coloration for the dinosaurs. I think the idea of letting your pour create the details and intricacies of the coloration is really cool with the cells and webbing and other effects that you can achieve.
- Layer your pour cup as you wish. The order that I added colors to my cup was:
- Green painting: neon green, dark green, medium green, yellow, medium green, dark green, light blue.
- Red painting: yellow, neon orange, red
- Blue painting: light blue, dark blue, medium green, neon green
- Place your canvas upside down on top of your cup and flip the whole thing over so that your cup is upside down on top of your canvas.
- Remove your cup.
- Tilt the paint until it covers the canvas in a way you like.
Add the Dinosaur Silhouette


- I cut out these cute little baby dino templates on my Cricut, but you can definitely cut them out by hand.
- I like using the page that I cut the dinos out of, where the hole the shape of dinosaur silhouette is, to see where the dinosaur will look best on the canvas and what their coloration will be.
- Put the dinosaur silhouette template on the canvas where you’ve decided.
- Take the gesso and paint it onto the canvas, brush out and away from the template so that the paint doesn’t leak under the template.
- Remove the template and allow the canvas to dry.
Paint the Background of your Dinosaur Painting


Now it’s time to paint the background in.
- The first part of the background that I worked on was the grass/ground. For this tryptic to flow, one of the things I did was to make sure that the horizon line carried through the paintings.
- Next, I painted the larger swaths of sky in.
- Take a smaller paint brush and get into the edges of the dinosaur.
- Paint some clouds in if you want.
Add Details to your Dino Painting


You can get super creative with this and get as heavy into the details as you want. The more details you do, the more realistic you’ll get. Since I wanted these to be animated and fun and for kids, more fantasy-like, I opted for less details, but there are some fun ones in here.
- I added a little bit of dimension to the grass by feathering in a darker shade of green.
- Then I added shaddows to the dinosaurs.
- With the back of a paintbrush I dotted in some yellow flowers with magenta centers.
- I used a palette knife to add in some grass blades and stems and leaves on the flowers.
- Also with the back of a paintbrush I dotted on the dinosaurs’ eyes and their pupils.
Refine your Dinosaur Painting


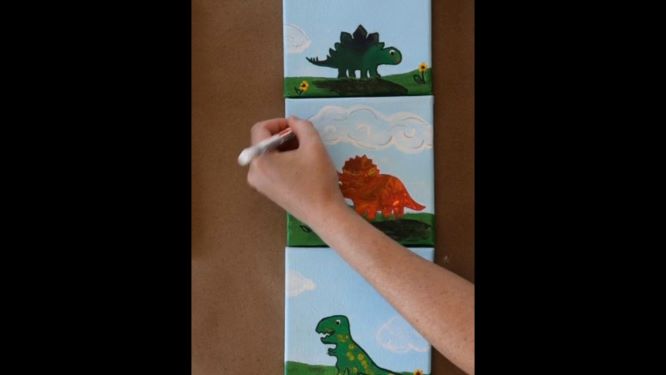
I love using paint pens to add crisp details and fun embellishments. If you’re using these paint pens for the first time, here’s some tips: Follow the instructions for getting them started. It will take a while. When the paint stops flowing, press it on a spare piece of paper until it starts flowing again.
- Add a crisp outline to each dinosaur silhouette.
- Add some more definition to the vegetation.
- Add some detail to the clouds.
Go Forth and Pour!
So now you have an awesome dinosaur painting! If you like painting animals, here are some other posts that you should check out for inspiration:


As always, check out my updates on Facebook and Instagram and feel free to peruse Homebody Hall for more fluid art tips, tricks, and tutorials! Also head over to Youtube and subscribe to get my videos sent to you as soon as they come out!!

Ideas for Painting Mountains at Sunrise
5 Inspiring Night Painting Ideas for Artists
Water Flower Ideas that Make Boring Days More Creative
Want to remember this simple acrylic pouring dinosaur painting? Pin this tutorial to your favorite Pinterest Board!