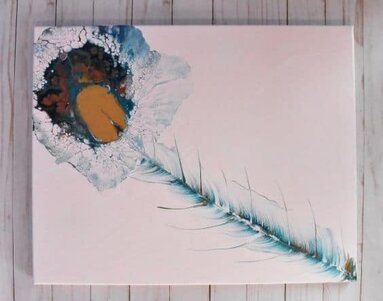
Peacocks are beautiful, iconic, and universal, and so are their feathers. Now, it may seem a complex task to paint one, but it’s really not with acrylic pouring. I’ll show you just how you can go about making your own beautiful acrylic pouring peacock feather painting.

If you’re pouring for the first time and would like more explanation on materials, processes, and terms, you can head on over to my Beginner’s Guide to Acrylic Pouring. You can also head over to my Comprehensive Guide to Acrylic Pouring Techniques for more information on all of the different techniques and my How to Thin Acrylic Paint for Acrylic Pouring post to learn all about pouring mediums!
So how do you make a peacock feather painting with acrylic pouring? Well, the two techniques that I used were:
- Dutch Pour Technique
- String pull
What colors do you need to paint a peacock feather painting?
Like I said above, I think that peacock feather’s are pretty iconic, and when you say that term, almost everyone can conjure up an image of that feather in their mind, both the shapes and the colors.
Because peacocks have such distinctly shaped tail feathers, I think that you could really go a variety of ways in colors and still have it be quite evident what it is that you are painting.
But I personally chose to go for a traditional color palette of teal, blue, gold, and copper. I also chose to use 3 metallic colors to mimic that irridescent quality that peacock feathers have.
For the background, instead of doing an all-white background, I went ahead and opted for a very subtle pink to make the blues in the feather stand out more.
(If you’re curious about colors and color theory as it relates to acrylic pouring, head on over to my post about Choosing Colors for Acrylic Pouring and grab your FREE printable Color Wheel and Color Scheme Guides below!)
Materials You Will Need to Paint a Peacock Feather Painting with Acrylic Pouring
This post contains affiliate links, which I earn a small comission from. These are provided for your convenience, and the price isn’t increased at all.
Paints:
- Artist’s Loft Metallic Cobalt
- Artist’s Loft Copper
- Artist’s Loft Old Gold
- Artist’s Loft Brilliant Blue
- Artist’s Loft Titanium White
- Artist’s Loft Deep Red
Pouring Medium:
- Floetrol
- Water
Tools:
Canvas:
How to Paint a Peacock Feather Painting Video Tutorial
Step-by-step Peacock Feather Painting with Acrylic Pouring
- Lay down an even base coat of a background color of paint (mine wasn’t so even, and it shows now)
- Layer the colors that you want for the “eye” of the peacock feathers in a round puddle where you would like the center of the eye to be.
- Pour a circle of your background color around the puddle of color.
- Using a hairdryer or some other way of moving air, blow the extra background color you just put down up and over the puddle of color.
- Now blow the paint outward in all directions creating a circle.
- Place a small puddle of the color that you want for your focal point in the bottom center of your Dutch pour to create the true eye of the feather.
- Next, pour some paint in a straight line off of your canvas. Use the colors that you want the stem of the feather to be.
- Dip your string in the paint, covering it generously.
- Lay down the string stating at the eye of the feather and moving outward.
- Drag the end of the string that is furthest from the eye of the feather out slightly and up toward the eye of the feather.
- Repeat this process for the other side of the feather.
- Using a palette knife or some other pointed implement, drag a line down from the eye of the feather all the way down the center to the other end of the feather.
- Next use the palette knife to draw up the center of the eye so that it has that characteristic fork.
- Last, draw out some longer swipes from the feather’s center.
Go Forth and Pour!
And that’s that, now you’ve made your very own peacock feather painting using the Dutch pour and a string pull.
If you want to learn more about either of these techniques, check out the posts below.
As always, check out my updates on Facebook and Instagram and feel free to peruse Homebody Hall for more fluid art tips, tricks, and tutorials! Also head over to Youtube and subscribe to get my videos sent to you as soon as they come out!!
And now you can joing my Facebook Group, Flourishing Fluid Arts with Homebody Hall and get help, tips, inspiration and just hang out and have a great time!
2024 Color Palettes for Creating Updated Art
Let’s Throw a Paint Party: How to Host Your Own Paint and Sip
Do It Yourself Countertop Paint: Update Your Kitchen With Pour Paint
Want to remember this simple acrylic pouring peacock feather painting? Pin this tutorial to your favorite Pinterest Board!


