I love the holidays, and part of that warm, special feeling of the holidays comes from the decorations, and this year, I decided to add a simple acrylic Christmas tree painting on canvas to our assortment of Christmas decorations.
This easy, whimsical Christmas tree painting is painted with very simple acrylic pouring techniques and is easy enough that it makes for a great Christmas acrylic painting for beginners and kids.
If you’re pouring for the first time and would like more explanation on materials, processes, and terms, you can head on over to my Beginner’s Guide to Acrylic Pouring. You can also head over to my Comprehensive Guide to Acrylic Pouring Techniques for more information on all of the different techniques and my How to Thin Acrylic Paint for Acrylic Pouring post to learn all about pouring mediums!
So how do you paint a Christmas tree painting with acrylic pouring? Well, the four techniques that I used were:
- String Pull
- Puddle Pour
- Modified Chain Pull
- Swipe
What colors do you need to paint a Christmas tree painting?
For the most part, I went fairly traditional with my Christmas tree color scheme, using two shades of green and gold decorations. But I did try to add a pop of color to the ornaments and used a couple of metallics to ad some shine.
If I did this one again, I would proably go with a red over the purple for the ornaments because the purple dried a tad darker than I would have liked, but I’m happy with the result overall.
(If you’re curious about colors and color theory as it relates to acrylic pouring, head on over to my post about Choosing Colors for Acrylic Pouring and grab your FREE printable Color Wheel and Color Scheme Guides!)
Materials You Will Need to Paint a Christmas Tree Painting with Acrylic Pouring
This post contains affiliate links, which I earn a small comission from. These are provided for your convenience, and the price isn’t increased at all.
Paints:
- Artist’s Loft Titanium White
- Violet made from Ultramarine and Magenta (Master’s Touch Ultramarine (Buy on Hobby Lobby / Amazon) and Liquitex Basics Quinacridone Magenta)
- Artist’s Loft Lemon Yellow
- Artist’s Loft Old Gold
- DecoArt Dazzling Metallics Festive Green
- Artist’s Loft Copper
- Green made from the Lemon Yellow and Ultramarine mentioned above.
Pouring Medium:
- Floetrol
- Water
Tools:
- Palette Knife
- Mardis Gras Beads (sourced at the Dollar Tree)
- String or yarn (I used thick cotton yarn LIKE THIS for this painting.)
- Paperclip
- Popsicle stick, skewer, pencil you don’t care about
Canvas:
Step-by-step Christmas Tree Painting with Acrylic Pouring
Paint the Main Body of the Christmas Tree
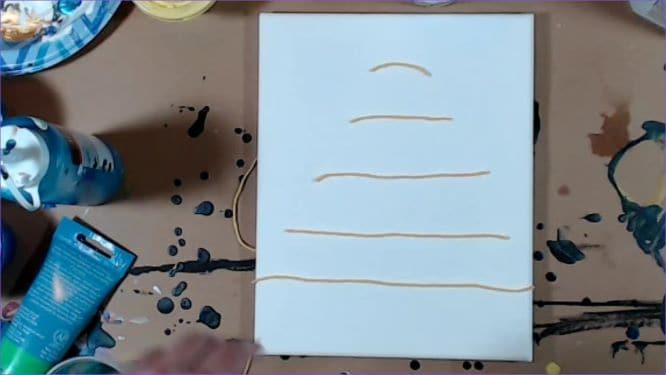
- Cut several pieces of string, gradually making them smaller. For this painting, I used 5 pieces of string, but I would recommend using more for a more filled out look to your Christmas tree.
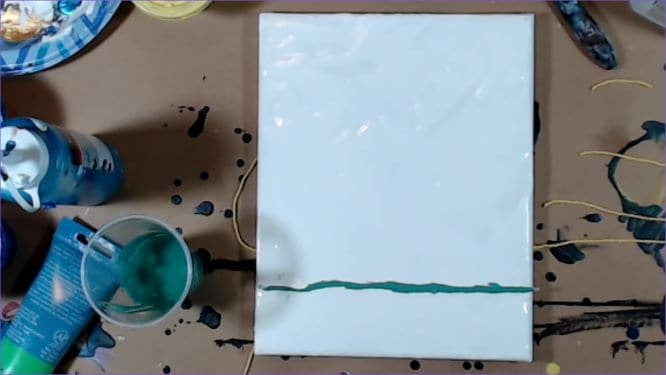
- Lay down a nice, even base coat of your background color so that your paint has something to move through.
- Dip the pieces of string you cut in the green paint, covering the string entirely, and lay them flat on the canvas. I alternated between the regular green and the metalic green, but you could do any colors you want.
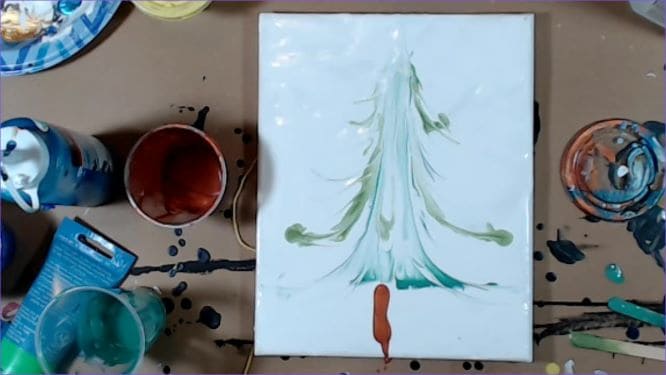
- Hook a paper clip into the middle of the longest string and drag that string up toward the top of the canvas, hooking each string as you proceed toward the top of the canvas. I couldn’t find a paperclip so I found a pen cap with a hook that I wasn’t attached to and used that.
- Once you’ve dragged all the strings up, use your pallet knife, popsicle stick, or skewer, and fill out your Christmas tree by pulling paint out from the center to create more branches.


Add on the Trunk of your Christmas Tree
- Add a line of copper in the center of the tree from the bottom of the tree to the bottom of the canvas.
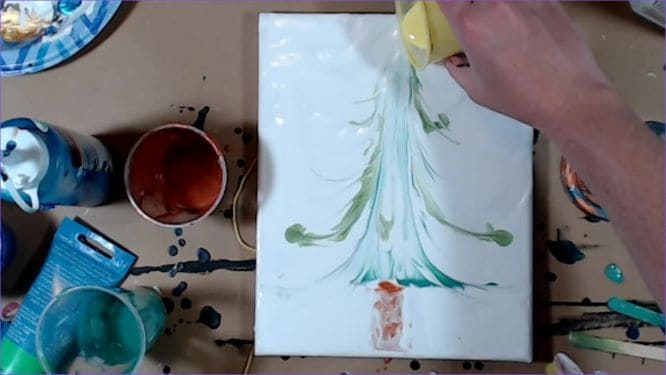
- With your palette knife, swipe some of the white base coat over the copper to mimic the look of bark.


Decorate your Christmas Tree
- The first thing I did was add the star to the top of the Christmas tree by pouring a small puddle of yellow paint and drawing it out to points with a palete knife.
- Then I added the garland to the tree by dipping a string of mardis gras beads into old gold paint and laying them down the body of the tree in a zigzag fashion.
- Next I added ornaments to the tree by dipping a pencil into purple paint and dolloping it into cirlces onto the tree. You could also use a popcicle stick or a skewer or something like that.
- Lastly, I brought some of the gold up ito the star the same way as I did with the yellow in Step 1.


Go Forth and Pour!
Feel free to take this Christmas tree painting and make it your own! Add decorations that remind you of home or throw some snow on that beautiful tree, whatever makes the holiday season special for you!
And as it’s getting closer to the holidays, you may be needing some ideas to give your loved ones of what they can get you for Christmas, so I’ve put together my list of 43 Genius Gift Ideas for Artists who are into Acrylic Pouring.
As always, check out my updates on Facebook and Instagram and feel free to peruse Homebody Hall for more fluid art tips, tricks, and tutorials! Also head over to Youtube and subscribe to get my videos sent to you as soon as they come out!!
