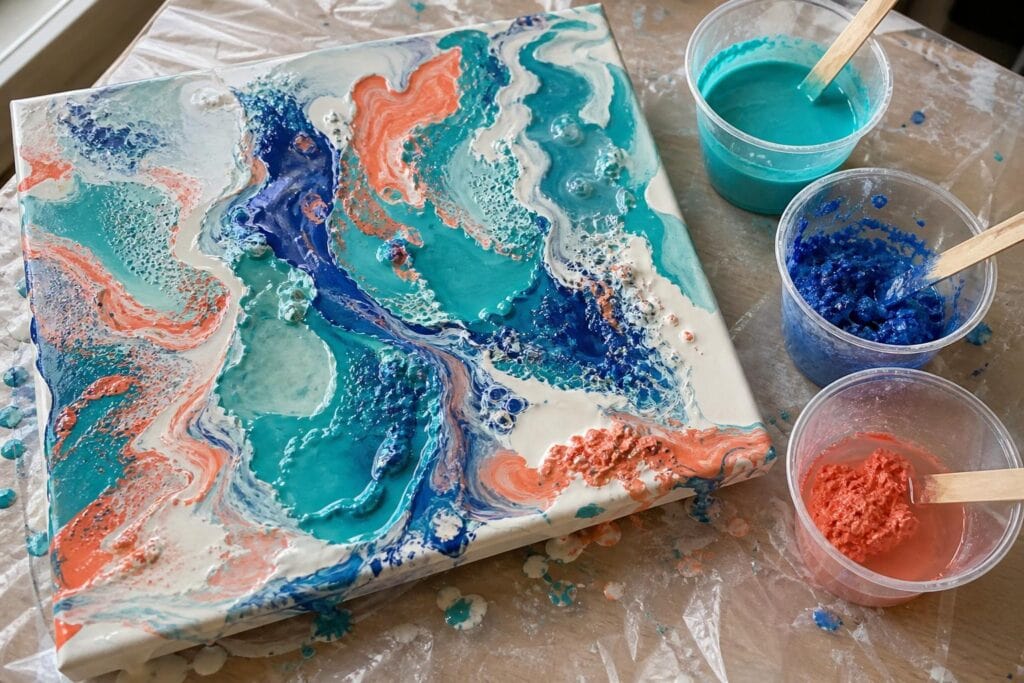
Few things make an acrylic pouring session feel uncertain faster than finding a strange layer of liquid sitting on top of your paint. Sometimes the mixture looks grainy in the cup. Other times the colors pull away from one another on the canvas, leaving bare spots, oily circles, or little clumps that refuse to flow.
I have had mixtures look perfectly smooth for the first few minutes and then begin separating while I prepared the canvas. I have also poured colors that behaved beautifully on their own but reacted badly as soon as they touched in a dirty pour cup. Paint separation can be frustrating, but it does not automatically mean the entire painting is lost.
The most useful response is to identify whether you are seeing normal settling, an inconsistent mixture, or a genuine compatibility problem.
What Paint Separation Looks Like in an Acrylic Pour
Separated pouring paint does not always look the same. In the mixing cup, you may see watery liquid collecting around the edges or floating on top. The paint might resemble cottage cheese, with soft lumps suspended in a thinner liquid. It may also look streaky after stirring, as if the paint and pouring medium never become one mixture.
On the canvas, separation often appears as paint pulling away from certain areas. You may see tiny craters, unusual bare patches, ragged color boundaries, or a slick layer that moves independently from the acrylic paint. This is different from intentional cells. Healthy cells usually have defined color edges and develop within a continuous paint film. Separation tends to look broken, greasy, or curdled.
Some pigment settling is normal, especially when a mixed cup has been sitting for a while. If a slow stir returns it to a smooth consistency, I would not consider that a serious problem. If stirring creates more clumps or the liquid immediately splits again, something in the recipe needs attention.
The Most Common Reasons Pouring Paint Separates
The Ingredients Are Not Working Well Together
Acrylic paint, pouring medium, water, silicone, glue mixtures, and flow additives each bring different ingredients into the cup. Many combinations work, but combining too many products increases the chance that their binders and surfactants will resist one another.
One mistake I see often is a beginner using one pouring medium, adding a little glue, adding water, and then adding silicone because each ingredient appeared in a different tutorial. The final mixture has no clear recipe. When it separates, it is difficult to know which product caused the trouble.
I recommend learning with acrylic paint and one dependable pouring medium. Add only the small amount of water needed to reach a pourable consistency. This approach may produce fewer dramatic surprise cells than a complicated additive recipe, but it is much easier to control and troubleshoot. For beginners, control is more valuable than chasing every possible effect at once.
Too Much Water Has Weakened the Mixture
Water can help thick paint flow, but it does not replace pouring medium. Excess water spreads the acrylic binder too thin and can leave pigment floating in a weak, uneven mixture. The paint may look acceptable in the cup yet pull apart as it travels across the canvas.
I learned this after trying to make a heavy body white behave like a fluid acrylic by adding water too quickly. It poured easily, but it broke into chalky islands around the other colors. Now I add pouring medium first and use water only for the final consistency adjustment.
The Paint Consistencies Do Not Match
A thick color can sink beneath a thin color, while a watery color may race across the surface and leave the heavier mixture behind. This movement can resemble chemical separation even when the products are technically compatible.
I have noticed this most often with titanium white. It can feel smooth while still being much denser than transparent colors. Rather than relying only on a fixed ratio, I compare how each color runs from the stirring stick. I want a steady ribbon that folds into the cup briefly before disappearing. Every color does not need to be identical, but one should not fall in blobs while another drips like tinted water.
Old Paint or Contaminated Tools Are Interfering
Paint that has frozen, partially dried, or developed small skins may not return to a reliable pouring consistency. Old pouring medium can also become lumpy. A cup carrying silicone residue from a previous session may create repelling spots even when no silicone was added to the current mixture.
What surprised me most was how little residue it took to affect a pour. A stir stick that felt clean still carried enough oil to make my base coat open into scattered craters. I now keep tools used with silicone separate from the tools used for silicone free pours.
How to Fix Separated Paint Before Pouring
Stop adding ingredients. Adding more water, oil, or medium without identifying the problem usually makes the cup harder to rescue.
Stir slowly from the bottom and scrape the sides of the cup. Give the mixture a full minute rather than a few quick circles at the surface.
If the paint is smooth but too thick, add a small amount of the same pouring medium already in the recipe. Mix completely before deciding whether it needs more.
If the mixture contains skins or dried particles, strain it into a clean cup. Straining can remove debris, but it will not repair paint that has chemically curdled.
Test a spoonful on a tile, palette paper, or old canvas. Tilt the surface and watch whether the paint stays continuous or breaks into watery edges.
If the cup remains grainy and immediately separates after stirring, I would not add it to a large pour. Set it aside for a small experiment instead. Saving a few ounces of paint is rarely worth risking every other color and a prepared canvas.
What to Do If Separation Starts on the Canvas
First, resist the urge to torch heavily. Heat can make a weak or oily mixture move more aggressively, and it may set the surface before the layers underneath stabilize.
If the paint is still very wet, tilt the worst separated area toward an edge and let it run off. You can then add a small amount of freshly mixed compatible paint to restore coverage. For an isolated crater, place a little matching base color into the opening and gently tilt rather than stirring the area with a tool.
If clumps are moving through the design, lift them out with a clean palette knife or craft stick. The surrounding pattern may close around the spot as you tilt. I have rescued several pours this way, although the final composition was different from the one I originally imagined.
There is a tradeoff here. More tilting can remove damaged paint, but it also stretches cells and blends colors. I prefer losing part of a pattern over leaving a greasy patch that may dry poorly.
Simple Mixing Habits That Prevent Separation
Use clean cups and dedicated silicone tools. Mix each color completely before adjusting its consistency. Add water in small amounts, and give thick colors enough time to incorporate the pouring medium. Let newly mixed paint rest briefly so bubbles rise, then stir once more before loading the pour cup.
Keep a note of the paint brand, color, medium, and approximate amounts used. Acrylic pouring recipes often need adjustment because pigments vary, but notes make repeated problems much easier to trace.
I also test unfamiliar paints before including them in a large composition. A quick puddle beside the other colors reveals strange edges, clumps, and density differences without sacrificing a canvas I was excited to pour.
Troubleshooting Questions
Can I use separated paint after stirring it again?
Yes, if slow stirring returns it to a smooth mixture that stays combined during a small tilt test. If it splits again within minutes, reserve it for experimentation rather than a finished pour.
Does silicone always cause paint to separate?
No, but too much silicone or poorly mixed oil can create slick patches and weak spots. I prefer only a few drops in selected colors, not silicone in every cup.
Will more pouring medium fix curdled paint?
Sometimes it helps a mixture that is merely too thick or unevenly mixed. It will not reliably repair incompatible or spoiled ingredients. Add a small amount to a test portion instead of changing the entire cup.
Can a separated pour still dry successfully?
It can, especially when the problem is limited and excess paint is tilted off. Watch for oily areas, exposed canvas, and thick clumps. Correct those while the pour is wet, then allow the painting to dry level without further manipulation.
