A wet acrylic pour does not need an entire studio, but it does need a few quiet days in a level, protected place. That can feel like a tall order when your pouring table is also your dining table, pets patrol every available surface, and the only open floor space is part of a busy walkway.
I have dried acrylic pours in spare bedrooms, on shelves, inside large plastic tubs, and on temporary tables that had to disappear before dinner. The most reliable setup has not been the largest or most expensive one. It has been a simple station that stays level, allows air to move, and keeps curious paws and drifting dust away from the paint.
What a Wet Acrylic Pour Actually Needs
Acrylic pouring paint may look settled after an hour, but it is still moving. The thicker areas continue leveling, cells can stretch, and paint can slowly collect along one edge. This is why the drying location affects the final composition almost as much as the last tilt.
I have noticed that even a slight slope can turn balanced negative space into an awkward bare corner by the following morning. On one early pour, I blamed my paint consistency when the real problem was a folding table leaning toward the wall. The colors had not mysteriously separated. Gravity had simply kept working after I walked away.
Your drying area should provide four things:
- A surface that is level in every direction
- Protection from dust, pet hair, insects, and accidental contact
- Enough airflow for moisture to escape
- Enough time for the painting to remain untouched
For most small canvases, I plan to leave the pour undisturbed for at least three days. Heavy paint, deep gallery canvases, humid weather, and large puddles can extend that time considerably. A dry looking surface does not always mean the paint underneath has finished curing.
Choosing the Best Location in a Small Home
My first choice is a sturdy shelf, counter, or table in a room that can be closed off. A spare room is useful, but a quiet corner of a bedroom can work just as well. I prefer a raised surface over the floor because it collects less hair and is easier to inspect without leaning over wet paint.
A kitchen counter can work if it will not be needed for food preparation. However, steam, cooking grease, and constant activity make kitchens less dependable than they first appear. Bathrooms are also tempting because the door closes, but changing humidity can slow drying and encourage subtle cracking in thick areas.
Closets are sometimes recommended for dust protection. I gently disagree with using a tightly closed closet for a very wet pour. The limited airflow can keep moisture trapped around the painting. If a closet is your only option, leave the door slightly open and use a ventilated cover over the canvas instead.
One mistake I see often is placing a fresh pour on top of a washing machine, freezer, or other appliance. The surface may be conveniently empty, but vibration and heat can affect the wet paint. Choose the most boring, stable location available. In acrylic pouring, boring is excellent during drying.
Build a Simple Level and Protected Station
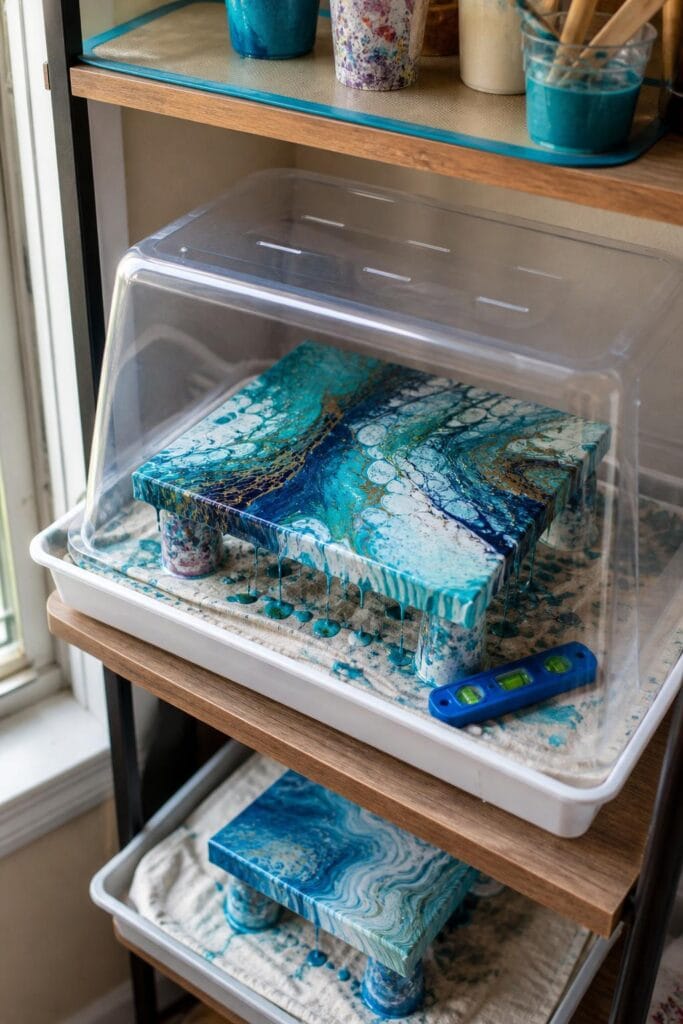
My favorite beginner setup uses a rigid board, four supports, a small level, and a clear plastic storage tub. It is compact, inexpensive, and easy to move before the paint is poured.
- Choose a rigid base. Use a piece of sealed wood, a sturdy shelf board, or a flat tray that will not flex under the canvas. Make it several inches larger than your painting so runoff stays contained.
- Protect the base. Cover it with a reusable silicone mat, plastic sheet, or freezer paper. Tape the covering underneath so a loose edge cannot touch the wet sides of the canvas.
- Raise the canvas. Place the painting on four matching cups, painter pyramids, or small blocks. Position the supports inside the canvas corners so they do not become glued to the runoff.
- Check the level. Place a small bubble level across the supports from left to right, then turn it and check from front to back. Add thin plastic shims or folded card beneath the base, not beneath individual canvas corners.
- Add a cover. Turn a clear plastic storage tub upside down over the painting. Make sure the tub does not touch the canvas or hanging paint. Prop one edge up slightly with two small spacers to create airflow.
- Test before pouring. Set a dry canvas in the station and confirm that the cover fits comfortably. Once a pour is finished, carrying it through the house to discover the tub is too short is not a pleasant experiment.
I recommend leveling the entire base rather than adjusting each canvas support. Individual adjustments can twist a stretched canvas, especially when the bars are light. A stable base also lets you dry several small pours together without checking every piece separately.
What surprised me most when I began covering my pours was how much cleaner the surfaces became. Specks I had assumed were dried paint were often tiny fibers settling during the first several hours. The clear tub also lets me check the composition without lifting the cover repeatedly.
Working With Extremely Limited Space
If you cannot leave a table occupied, create a sliding drying board for the space beneath a bed or sofa. Use a rigid board with low supports and a shallow ventilated cover. Measure the clearance carefully, including the height of the canvas and cover.
This approach saves space, but it has a tradeoff. Areas close to the floor collect more dust and pet hair, and sliding a wet pour creates risk. I only recommend it when the board can be placed in position before pouring. Finish your composition at the station or carry the entire level board, rather than moving the wet canvas by itself.
A vertical shelving unit is another good option for several small acrylic pours. Each shelf must be independently level, with enough clearance for a cover. Do not place a fresh painting directly beneath an older pour that is still dripping. I learned this after one bright turquoise drip landed in the middle of a warm sunset palette. It became part of the painting, but not by choice.
Common Drying Problems and Easy Fixes
The paint is drifting toward one side
Check the station with a bubble level, even if the furniture looks straight. Floors and walls are not reliable guides. If the pour is still very wet, level the base gently without lifting the canvas. Avoid tilting the painting back and forth because that can stretch cells and muddy layered colors.
Dust or pet hair landed in the paint
If the paint is wet, use clean tweezers or the tip of a wooden skewer to lift the debris straight up. Do not chase it through the surface. If the paint has started forming a skin, leave it alone until fully dry. Removing it later may be less visible than tearing the soft paint film.
The cover has condensation inside
Increase the gap beneath the cover so moisture can escape. Do not aim a fan directly at the painting. Strong airflow can push dust under the cover and dry the top faster than the paint below, particularly where your pour has thick puddles.
The canvas is stuck to the supports
Runoff has probably dried around the cups or blocks. Before the pour dries, check that drips are falling freely and move the support slightly inward if it is catching paint. Silicone tipped supports are easier to release than paper cups, although cups are perfectly workable for beginners.
Can I stack several wet pours in one station?
Yes, if you use sturdy level shelves with generous space between paintings. Never balance boards on wet canvas corners or create a temporary tower from cups. Acrylic pours become surprisingly heavy when loaded with paint, and one wobble can ruin several pieces at once.
A small drying station does not need to be elegant. Mine have often looked like ordinary boards beneath upside down storage tubs. What matters is that the setup protects the choices you made while pouring. Once you know your painting can rest safely, you can stop hovering over every cell and begin the much harder part: leaving it alone.
