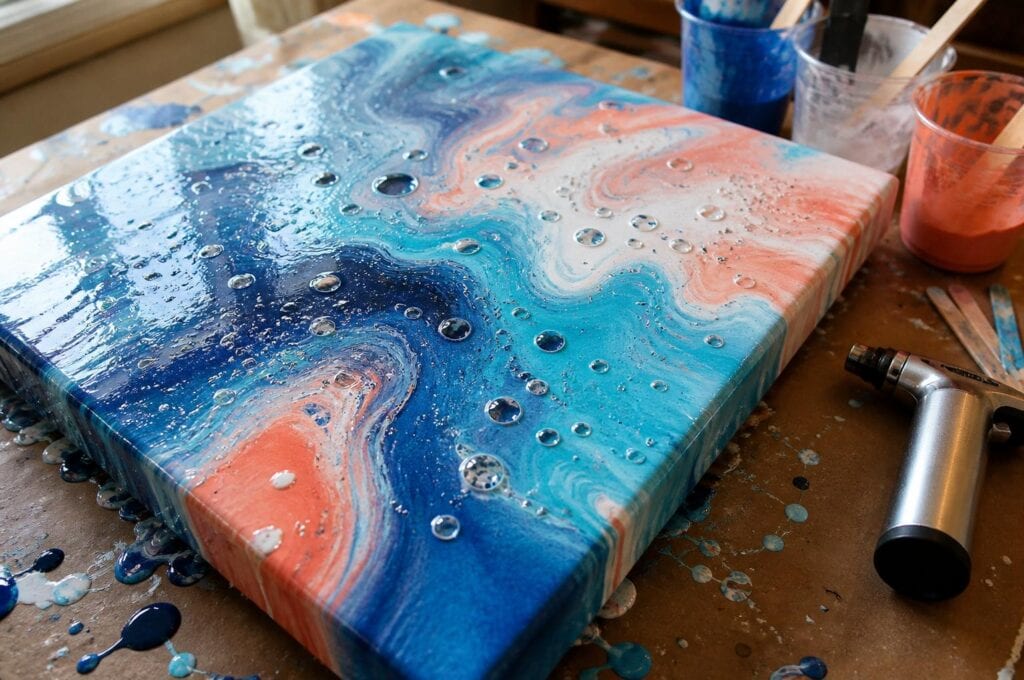
Air bubbles in an acrylic pour can be surprisingly sneaky. Your paint may look smooth in the cup, yet little domes appear as soon as you tilt the canvas. Sometimes they pop and disappear. Other times they leave tiny craters or pinholes in the dried surface.
I used to assume bubbles meant I had mixed my paint incorrectly. Mixing is a common source, but it is not the only one. After years of experimenting with different pouring mediums, consistencies, cup arrangements, and pouring styles, I have noticed that bubbles usually come from several small choices rather than one dramatic mistake.
The good news is that you do not need to chase every bubble with a torch. In fact, my preferred approach is to prevent most of them before the paint reaches the canvas, then remove only the obvious ones while the pour is still wet.
Why Air Bubbles Form in Acrylic Pouring Paint
Acrylic pouring paint traps air whenever it is stirred, shaken, squeezed, or dropped into a cup. Because pouring mixtures are thicker than water, that trapped air may take quite a while to rise.
If the mixture is especially thick, small bubbles can remain suspended until you begin tilting. The movement stretches the paint layers and brings those bubbles closer to the surface. This is why a cup can appear bubble free while your canvas suddenly looks covered in them.
Some bubbles are already present in the acrylic paint or pouring medium. A bottle that has been shaken before use can hold an astonishing amount of air. Squeezing paint forcefully through a narrow cap can introduce more.
Layered cups can trap air between colors as well. Flip cups are particularly good at doing this because the paint lands quickly, folds over itself, and sits upside down against the canvas. That does not make the technique a problem. It simply means the cup may need more resting time before it is flipped.
How Mixing, Pouring, and Consistency Affect Bubbles
Fast stirring creates foam you may not see immediately
One mistake I see often is stirring pouring paint as if trying to beat lumps out of cake batter. Rapid circular stirring pulls air down into the mixture. If the stick repeatedly breaks the surface, it creates even more bubbles.
I made this mistake frequently when I first began pouring. I was so focused on achieving an even consistency that I kept stirring long after the paint was blended. I eventually realized that the final minute of vigorous mixing was undoing the careful preparation that came before it.
I now stir slowly, keeping the stick below the surface whenever possible. I scrape the bottom and sides of the cup, then fold the mixture through itself with calm, deliberate movements. It takes slightly longer, but the paint reaches the canvas with far less trapped air.
Thick paint holds bubbles longer
Thicker paint is not automatically wrong. It can produce bold ribbons, controlled movement, and strong color separation. The tradeoff is that bubbles rise more slowly through it.
Very thin paint releases air more easily, but thinning solely to prevent bubbles can weaken color, muddy a layered cup, or produce an underbound paint film if too much water is used. I would not recommend changing a successful consistency just to eliminate every tiny bubble.
Instead, aim for a mixture that flows from the stir stick in a steady ribbon and settles back into the cup without leaving a stiff mound. Then give it time. Resting is safer for beginners than repeatedly adjusting a mixture that was already usable.
Pouring from high above the surface adds air
A high pour creates a dramatic narrow stream, but the stream can fold air into the puddle as it lands. This is especially noticeable with straight pours and ring pours made from thicker paint.
In my experience, holding the cup closer to the canvas gives me smoother bands and fewer bubbles. I still lift the cup when I want a thin stream for composition, but I do not keep it high for the entire pour.
Simple Ways to Prevent Bubbles Before You Pour
My most reliable bubble prevention routine is simple:
Bring the paint, medium, and water to a comfortable room temperature. Cold pouring medium tends to be thicker and slower to release air.
Stir each color slowly. Keep the stir stick inside the mixture rather than repeatedly lifting it through the surface.
Scrape the cup carefully so unmixed paint does not force you into another frantic round of stirring.
Let the mixed colors rest for at least fifteen to thirty minutes when possible. Thicker mixtures may benefit from a longer rest.
Tap each cup gently on the table. This encourages larger bubbles to rise without adding more air.
Pop visible surface bubbles with a clean toothpick before loading a layered cup.
Pour close to the canvas unless height is part of the effect you are intentionally creating.
What surprised me most was how much difference resting made. I once mixed two nearly identical sets of colors. I poured one immediately and left the other covered while I prepared canvases. The rested batch produced a noticeably smoother surface even though the paint recipes were the same.
Covering the cups loosely while they rest helps prevent dust without sealing them so tightly that condensation becomes a concern. I usually place a clean card or an upside down empty cup over them.
How to Remove Bubbles Without Damaging Your Pour
If bubbles appear after pouring, pause before reaching for heat. Many surface bubbles pop on their own during tilting. Others can be removed with very little intervention.
Use a toothpick for isolated bubbles
For one or two stubborn bubbles, I touch the center with a clean toothpick and lift straight up. This is especially useful near a focal area where a torch or heat tool could disturb cells across a wider section.
Give the canvas a gentle tap
With the canvas level, tap the underside lightly with your fingertips. This can bring hidden air upward. Do this before the paint starts forming a skin, and avoid striking hard enough to change the composition.
Use a torch only when it solves a real problem
A small torch can pop many bubbles quickly, but it is not required for every acrylic pour. Too much heat can scorch paint, create unwanted cells, damage a canvas, or set fire to silicone and other materials.
If I use one, I keep it moving and make a brief pass well above the surface. I never hold the flame over one spot. For beginners, I recommend toothpicks, resting, and gentle tapping first because those methods offer more control and fewer ways to damage a pour you already love.
A heat gun is not automatically gentler. It may push wet paint, distort rings, or open cells you did not intend to create. Blowing through a straw has the same compositional risk and can also add moisture. These tools are useful when movement is part of the technique, but they are not my first choice for simple bubble removal.
Troubleshooting Persistent Bubbles
Why do bubbles keep appearing while I tilt?
Your paint is probably thick enough to hold air below the surface. Tilt slowly and allow the paint to spread without aggressively rocking the canvas. For your next pour, give the mixed colors more resting time.
Why did the bubbles become pinholes after drying?
A bubble likely popped after the surface had begun to set, leaving too little flowing paint to close the opening. A heavy coat of paint, cold room, or quick drying surface can contribute. Remove visible bubbles early and make sure the canvas has enough paint to move freely.
Are all round spots air bubbles?
No. Cells usually show color separation and patterned edges. Bubbles look like raised clear domes or small circles reflecting light. Before popping anything, view the pour from the side. I have seen beginners destroy lovely cells because they mistook them for air.
Will a few bubbles ruin my acrylic pour?
Usually not. Tiny bubbles often level out, disappear into busy cell patterns, or become nearly invisible under varnish. Acrylic pouring is full of movement and texture. Remove the bubbles that genuinely distract from the design, then let the paint do what fluid paint does. A calmer process usually creates a smoother pour than trying to force every inch into perfection.
