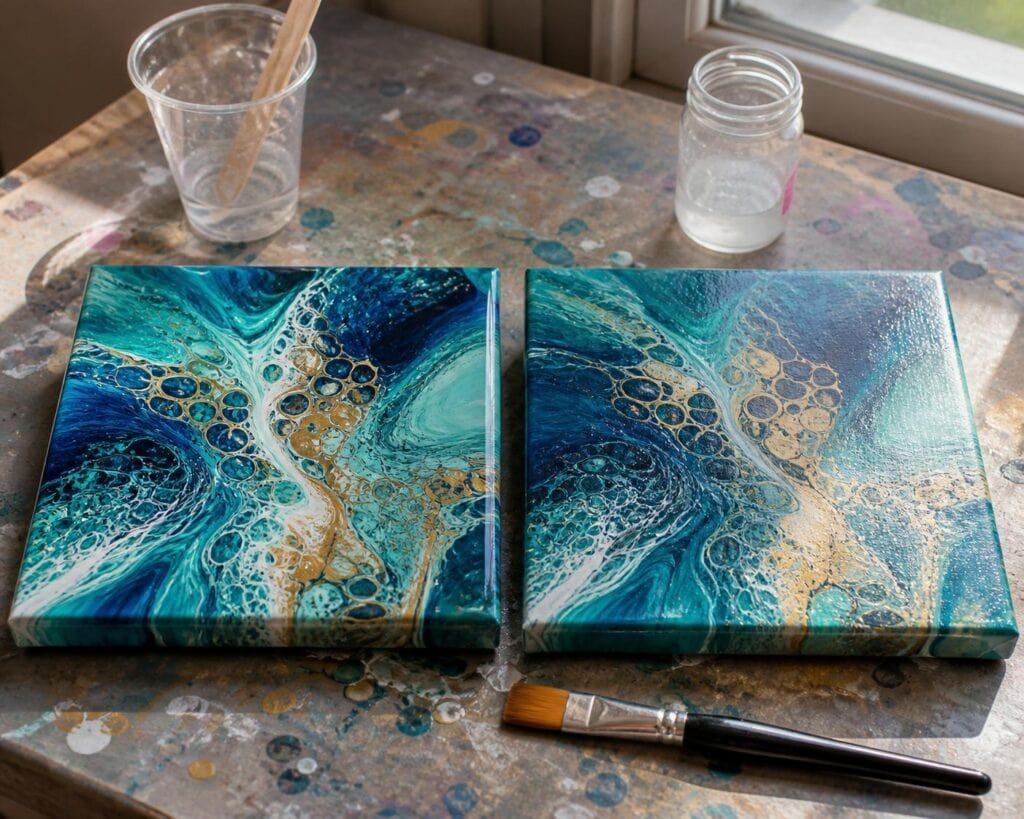
The finish on an acrylic pour does more than protect the paint. It changes how the colors look, how clearly the cells show, and even how substantial the finished painting feels. A deep gloss can make a dark galaxy pour look almost illuminated, while a softer varnish may suit a quiet beach pour without turning every reflection into a distraction.
I have used both resin and varnish on fluid art, and neither one is automatically the best choice. Resin creates dramatic depth, but it also adds expense, weight, and several opportunities for things to go wrong. Varnish is easier to control and usually more practical, especially while you are still learning how your pouring medium, silicone, paint thickness, and drying environment affect the surface.
Why Your Acrylic Pour Needs the Right Finish
Acrylic paint dries into a flexible film, but an unprotected pour can still collect dust, show fingerprints, and develop scuffs. Pouring medium can also leave a finish that looks uneven, with glossy areas beside dull patches. This is especially noticeable when a swipe or dirty pour dries with several different paint thicknesses.
The right finish unifies that sheen and makes the painting easier to clean. It can also restore some of the depth that seems to disappear as wet paint dries. I have noticed this most with turquoise, violet, and black. Those colors often look rich during the pour, become flatter after curing, and then regain much of their intensity under a clear gloss.
Finishing cannot repair every problem, though. Resin will not hide a lumpy paint skin, and varnish will not make cracked paint smooth. In fact, a glossy coating often emphasizes dried paint clumps, stray hairs, and tiny craters. Inspect the surface in angled light before deciding it is ready.
Resin and Varnish: The Differences That Matter
Appearance
Epoxy resin gives acrylic pours a thick, glasslike surface. It is particularly striking on geode pours, metallic compositions, and pieces with strong cell patterns. The coating creates visual depth because the clear layer sits noticeably above the paint.
Gloss varnish enhances color too, but the result is thinner and more like a traditional painting surface. Satin varnish reduces reflections, although it can soften the crisp appearance of cells. Matte varnish is rarely my first choice for fluid art. The matting ingredients can make dark colors look slightly cloudy and can reduce the wet look that attracts many of us to pouring in the first place.
Durability and Surface Choice
Resin forms a hard coating that handles light contact well, but it is not indestructible. It can scratch, and some formulas gradually develop an amber cast. A resin product marketed as UV resistant is preferable, although no epoxy should be treated as permanently immune to sunlight.
Resin works best for rigid wood panels. I do not usually recommend a heavy resin coat on a stretched canvas because the canvas can flex while the resin cannot. Large canvases may also sag under the added weight.
Acrylic varnish remains more compatible with the natural flexibility of a canvas. It is suitable for both canvas and wood panels, making it the more forgiving option for a typical beginner pour.
Cost and Difficulty
Varnish requires a clean brush or spray application and several thin coats. It is relatively affordable, and an imperfect coat can often be corrected with another careful layer once it dries.
Resin requires accurate measuring, thorough mixing, a level surface, protected edges, bubble control, ventilation, gloves, and a cover to keep dust away. There is also a limited working time. I learned this after mixing resin before my table was properly leveled. The coating slowly migrated toward one corner, leaving a thin area on the opposite side and a thick curtain underneath the panel.
What surprised me most was how much resin magnifies contamination. A trace of silicone oil that seemed harmless on the cured pour caused the resin to separate into small bare spots. Resin can be beautiful, but it is far less tolerant of rushed preparation.
How I Choose a Finish for a Pour
For most beginners, I recommend a water based gloss acrylic varnish made for paintings. It keeps the colors lively, works on canvas, costs less than resin, and gives you time to learn surface preparation without risking an entire batch of epoxy. Resin is worth considering later when the painting truly benefits from a thick glasslike surface.
I use the following questions before opening either product:
- Is the pour on flexible canvas or a rigid panel?
- Does the composition need dramatic depth, or simply an even sheen?
- Was silicone oil used to create the cells?
- Is the painting valuable enough to justify the resin cost and risk?
- Do I have a level, ventilated, dust free space that can remain undisturbed?
If the piece is on canvas, I usually choose varnish. If it is a small wood panel with metallic lines, rich dark colors, or a geode design, resin may add something special. I do not resin every successful pour. In my experience, using it selectively makes more sense than treating it as the required final step.
A Practical Varnish Process
- Let the acrylic pour cure completely. A thick pour may feel dry on top while moisture remains underneath. I commonly wait at least two to four weeks, and longer for very thick paint.
- Inspect the surface for silicone, dust, hairs, and raised paint fragments.
- If silicone was used, remove the residue carefully. I first absorb visible oil, then clean gently without aggressive scrubbing. Test your cleaning method on an unimportant pour because strong cleaners can damage the acrylic film.
- Apply thin coats with a soft, wide brush, following the product instructions. Avoid repeatedly brushing an area that has started to set.
- Allow each coat to dry fully before adding the next. Two or three thin coats usually look better than one heavy coat.
One mistake I see often is pouring on a thick puddle of varnish to imitate resin. Heavy varnish can trap cloudiness, create ridges, and collect around the edges. Varnish performs best as varnish, not as a substitute for a deep epoxy layer.
Common Finishing Problems
Why Is the Finish Separating Into Craters?
Silicone or another oily contaminant is the likely cause. Stop adding more finish. Let the surface dry, clean it according to the finish manufacturer’s directions, and test a small area before recoating. With resin, these bare circles are often called fish eyes, and prevention is much easier than repair.
Why Does My Varnish Look Cloudy?
The coat may be too thick, the previous coat may not have dried, or humidity may be interfering with curing. Matte and satin products can also appear cloudier over dark fluid art. Allow plenty of drying time before deciding the painting is ruined. Some water based coatings look milky during application and clear as they dry.
Why Are There Bubbles in My Resin?
Fast mixing introduces air, while cold resin holds bubbles more stubbornly. Mix slowly, follow the exact ratio for your product, and use only the bubble removal method recommended by the manufacturer. Excessive heat can scorch resin, damage acrylic paint, or create new surface problems.
Can I Resin Over Varnish?
Sometimes, but compatibility varies. I would not experiment on a favorite pour. Use products the manufacturers confirm are compatible and create a small test panel with the same paints, pouring medium, varnish, and resin.
A finish should support the personality of the pour rather than overwhelm it. Start with gloss varnish while you build confidence. When you have a rigid panel that genuinely calls for that deep, glasslike effect, resin becomes a creative choice instead of an intimidating requirement.
