There is a special kind of frustration that comes from admiring a freshly tilted acrylic pour, spotting a perfect ribbon of color, and then noticing one cat hair stretched across the center. Wet pouring paint seems able to collect debris from rooms the debris has never even visited.
I learned this after losing a battle with a long hair that landed in a pour featuring white, turquoise, and gold. I grabbed it with my fingers, lifted too quickly, and pulled a channel through several colors. The hair came out. Unfortunately, part of the composition came with it.
My current approach is less dramatic. I prepare the room before pouring, keep a raised plastic cover ready, and remove debris only while the paint is fluid enough to settle again. This simple routine has saved far more pours than complicated dust control ideas ever did.
Why Wet Acrylic Pours Collect So Much Debris
Acrylic pouring paint remains exposed much longer than a thin brushed layer. Pouring medium, water, and other additives slow the drying process, which gives dust and pet hair plenty of time to land. A large canvas may look settled after an hour while still being extremely wet beneath the surface.
I have noticed that debris often appears after I leave the room, not during the actual pour. Walking away stirs the air. Heating and cooling systems switch on. A pet passes the doorway. Even removing gloves or shaking out a paint covered apron can send tiny fibers toward the drying surface.
Silicone oil can make the problem more visible. Dust may settle into oily patches and remain outlined after drying. Dark colors also reveal pale lint mercilessly, while white paint makes every dark hair look like it arrived specifically to test your patience.
The goal is not to create a laboratory. The goal is to reduce air movement during the vulnerable first part of the drying process and place a clean barrier above the painting without sealing it into a damp container.
Prepare the Space Before You Mix Paint
One mistake I see often is vacuuming immediately before pouring. It feels responsible, but a vacuum can launch fine dust into the air, where it may float until your canvas is wet. I prefer to vacuum the day before. Shortly before pouring, I wipe the work surface and nearby floor with a slightly damp cloth.
Here is the preparation routine that works best in my pouring space:
Choose a drying location away from open windows, ceiling fans, and busy walkways.
Clean the table, level the surface, and place the canvas supports before opening paint.
Wipe the outside and inside of the drying cover with a damp microfiber cloth, then let it dry.
Move pets out of the room before mixing colors. Closing the door after a curious cat enters does not remove the hair already floating around.
Wear clothing that does not shed. Fuzzy sweaters and fluid art are not reliable partners.
Place tweezers and wooden toothpicks within reach before beginning the pour.
I also turn off strong fans while pouring and covering the piece. If the room needs climate control, I do not shut it down for the entire drying period. Stable temperature matters, especially for thicker pours. I simply avoid placing the canvas directly under moving air.
My Preferred Cover for a Wet Pour
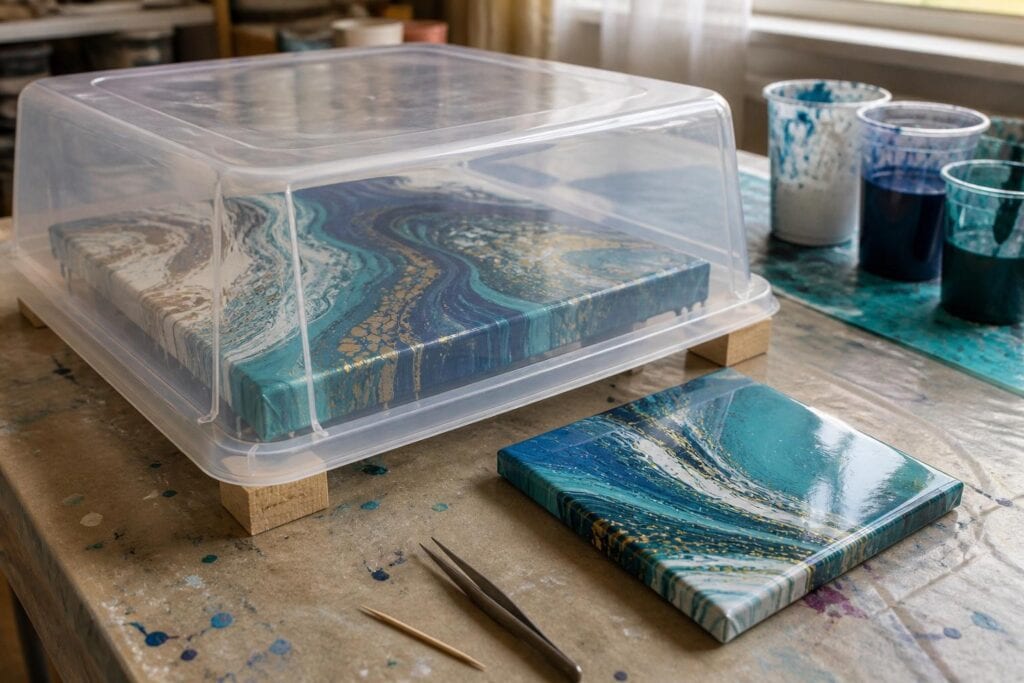
For most beginners, I recommend a clear plastic storage tote turned upside down over the painting. It is affordable, reusable, easy to clean, and transparent enough that you can check the surface without lifting it repeatedly.
The tote must be larger than the canvas with room around every edge. I set it over four equal supports so the bottom rim sits about an inch above the table. Small wood blocks, sturdy cups, or clean paint containers can work, provided they are identical in height and cannot tip.
That raised gap is important. It allows gentle airflow and gives moisture somewhere to escape. A tote placed tightly against the table can hold humidity around the pour and slow drying. It may also encourage uneven curing if one side has a gap and the other does not.
How to Set It Up
Level the drying table before pouring. A cover cannot rescue paint that slowly slides toward one corner overnight.
Place the canvas on pushpins, small cups, or another stable support inside a shallow tray.
Arrange the four cover supports outside the tray so they cannot touch wet drips.
Complete the pour and inspect the surface under good light.
Lower the tote straight down onto its supports without passing it closely over the paint.
Leave the cover in place during the early drying stage. Look through the plastic instead of lifting it every few minutes.
What surprised me most was how much cleaner my pours became simply because the cover stopped debris falling from above. I did not need an elaborate filtered cabinet. The small airflow gap was enough for the sizes and paint depths I usually pour.
Other Covers and Their Tradeoffs
A clean cardboard box can work, and I used one for a long time. It is inexpensive and easy to cut to size. The tradeoff is that cardboard can shed fibers, absorb moisture, and hide the painting from view. If you use one, wipe it carefully and raise it for airflow.
A mesh food cover allows excellent ventilation, but fine dust and narrow pet hairs can pass through it. Fabric tents are even less appealing to me because the fabric may sag or shed onto the pour. Tall food service trays with clear lids can be useful for small tiles and coasters, although they may trap moisture if closed tightly.
I gently disagree with advice to punch many open holes in a plastic tote. Open holes above the canvas create new paths for falling dust. For beginners, a raised rim is simpler and less risky than modifying the top of the cover.
When a Hair or Speck Still Lands in the Paint
First, look at the paint rather than reacting to the debris. If the surface is still fluid and glossy, you have a good chance of removing it cleanly. If a skin has formed, intervention may cause more damage than the original speck.
Removing a Hair From Fluid Paint
Use clean pointed tweezers to grasp the end of the hair that is resting nearest the edge of the canvas. Lift slowly, following the direction in which the hair lies. Do not pull it straight upward from the middle. A low, gradual lift disturbs less paint.
If the paint is fluid, the narrow trail will often close by itself. You can encourage it with the tip of a clean toothpick, moving only the paint immediately beside the trail. Avoid tilting the whole canvas again unless the composition genuinely needs it.
Removing a Small Speck
Touch a wooden toothpick beside the speck and lift from underneath. If it resists, guide it toward an edge rather than digging downward. Digging can expose the base coat or combine colors into a muddy dot.
I eventually realized that chasing every microscopic fleck causes more scars than it prevents. If a speck is tiny, submerged, and located in a visually busy area, leaving it alone may be the better artistic decision.
Troubleshooting Common Debris Problems
What if the paint has already formed a skin?
Do not drag the hair through it. Let the pour dry completely. If part of the hair remains raised, trim or lift that portion carefully with fine tweezers. A shallow embedded section may become much less noticeable after a compatible varnish is applied.
Can I sand out a dried dust bump?
You can lightly sand a fully cured pour, but this changes the sheen and may expose a different color layer. I reserve sanding for obvious raised debris on pieces that will receive a complete protective finish. It is rarely my first recommendation for a beginner.
Why did the cover leave marks near the edges?
The cover was probably too small or placed too close to wet drips. Use a wider tote and position its supports beyond the catch tray. Remember that paint can continue moving over the canvas edge after you cover it.
How long should the pour stay covered?
I keep it covered until the surface is no longer vulnerable to falling debris, usually at least overnight and often longer for thick pours. Drying time varies with paint depth, humidity, temperature, and pouring medium. Keep the cover raised until the painting feels dry across the surface, then allow it to cure in clean open air.
A stray hair does not mean the pour is ruined, and a drying cover does not need to be sophisticated. A clean raised tote, a quiet room, and the patience to remove debris slowly are usually enough to protect the cells, ribbons, and delicate color transitions you worked so hard to create.
