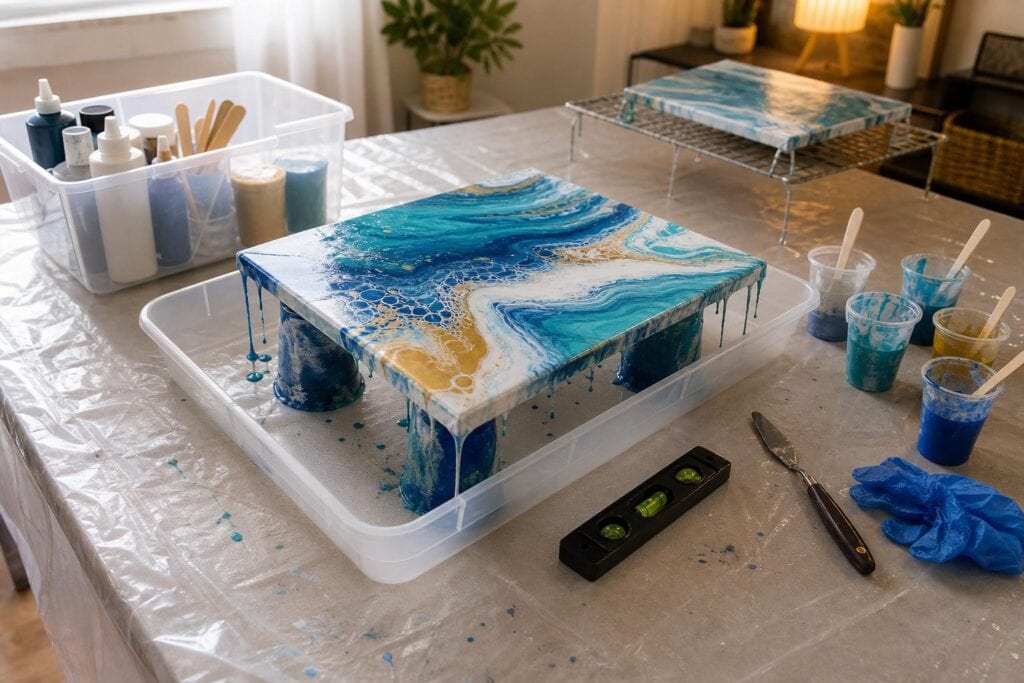
You do not need a dedicated studio to enjoy acrylic pouring. I have poured on folding tables, kitchen counters, and temporary surfaces tucked into spare corners. The important thing is not how impressive the space looks. It is whether you can mix paint, tilt a canvas, and leave the finished pour alone without worrying about your floor, your pets, or tomorrow morning’s breakfast.
I learned this after trying to make one small table do everything. My paint cups crowded the canvas, used sticks rolled through puddles, and a finished pour had to be moved before it was ready. A good home pouring workspace prevents those little problems before they interrupt the fun.
What Your Acrylic Pouring Workspace Really Needs
For beginners, I recommend starting with a sturdy table, a washable covering, a separate drying board, and one container for frequently used supplies. This simple arrangement is more helpful than buying studio furniture before you know how often or how large you want to pour.
Your table should allow you to reach every side of the canvas without leaning into wet paint. A dining table can work, but a basic folding table is often better because you can walk around it and leave it covered between sessions. The tradeoff is that lightweight folding tables sometimes flex or wobble. Test the surface with both hands before placing a wet canvas on it.
Lighting matters because wet acrylic reflects more light than dry paint. A bright lamp placed slightly to one side will help you see lumps, uncovered corners, and thin spots without creating a large glare directly above the canvas. In my experience, side lighting also makes subtle cells and metallic colors much easier to judge.
Keep ventilation in mind, especially if you use silicone, varnish, resin, or products with stronger odors. Read the label for every medium rather than assuming all fluid art supplies have the same requirements. I prefer to begin with water based acrylic paint and pouring medium because they are easier to manage in an ordinary home workspace.
Protect More Space Than You Think You Need
Acrylic pouring paint travels. It drips from canvas corners, runs down gloves, and somehow appears under cups that looked clean. I have noticed that beginners usually protect the center of the table but forget the edges and the path between the table and the drying area.
Cover the entire tabletop with a reusable vinyl tablecloth, thick plastic sheet, or silicone mat. Thin plastic film is inexpensive, but it wrinkles easily and can lift when you tilt a larger canvas. I prefer a reusable covering because it stays flatter and dried acrylic can often be peeled away.
Protect the floor beneath the table and at least a couple of feet around it. A plastic drop cloth works well, although placing an old towel or absorbent pad over the busiest section helps stop wet paint from being tracked across the room. Wear old clothes, an apron, disposable gloves, and shoes that can survive a colorful accident. Pouring barefoot is not worth the risk of stepping on a dropped pushpin or carrying paint through the house.
One mistake I see often is rinsing cups filled with leftover acrylic directly into the sink. Wipe wet paint into a trash container first, or allow small leftovers to dry before disposal according to local guidance. Keeping a lined waste bowl beside the mixing area makes cleanup much easier and keeps acrylic solids out of household plumbing.
Create Three Small Zones
You do not need three tables. You need three clearly assigned places: one for mixing, one for pouring, and one for drying. Even a single table can be divided into zones if your drying board can be moved somewhere safe afterward.
The Mixing Area
Place paints, pouring medium, water, cups, sticks, gloves, and a small waste container together. I like to mix on a tray because it catches spills and can be carried to the sink after most of the wet paint has been wiped away. Keep finished color cups behind or beside your dominant hand so you are less likely to knock them while reaching across the canvas.
The Pouring Area
Raise the canvas on sturdy cups, small blocks, or pushpins so paint can run freely from the edges. Check that every support touches the table and does not rock. Leave enough open space to set down a palette knife or catch cup without placing it inside a puddle.
What surprised me most when I began pouring was how much easier composition became when I could walk around the canvas. Being able to view a swipe or dirty pour from all four sides helped me stop tilting before the most interesting section disappeared over an edge.
The Drying Area
The drying surface must be flat, stable, and out of normal household traffic. Place a rigid board beneath the raised canvas so the entire painting can be moved without touching it. Use a small spirit level to check the board from side to side and from front to back. Slide folded cardboard or thin wooden shims underneath until it is level.
I eventually realized that many pours I blamed on paint consistency were actually drying on a slight slope. The design looked balanced when I left it, then slowly drifted toward one corner. Leveling the drying board before every session is now part of my paint preparation.
Protect wet work from dust and pet hair with a large clean tote or lightweight cover raised slightly for airflow. Make sure the cover cannot sag onto the paint. Leave the pour undisturbed until the surface is thoroughly dry, which may take several days when paint is thick or the room is cool and humid.
A Practical Beginner Workspace Checklist
- Sturdy table with room to reach every canvas edge
- Reusable table covering and wider floor protection
- Bright side lighting
- Tray for mixing cups and paint bottles
- Raised supports for the canvas
- Rigid drying board and small spirit level
- Clean cover for dust and pet protection
- Gloves, apron, waste bowl, and cleaning cloths
Common Workspace Problems and Simple Fixes
Why did my design slide to one side overnight?
Check the drying board with a level before changing your paint recipe. If the board is level, inspect the canvas itself. Some budget canvases are slightly warped, so one corner may sit lower even when the board is correct. Support the canvas evenly and avoid drying it directly on a soft surface.
Why is my painting stuck to the cups underneath?
Paint drips have dried around the bottom edge and bonded to the supports. Raise the canvas with pushpins or narrower contact points, then gently wipe hanging drips after the paint has settled. Do not repeatedly scrape the edges while the composition is still moving.
What if I have no permanent room for pouring?
Build the workspace around a portable drying board. Mix and pour on a protected kitchen or folding table, then carry the entire board to a level shelf, spare room, or secure closet. Test the route first with an empty canvas. Doorways feel surprisingly narrow when you are holding a fresh fluid painting.
Do I need a storage rack?
Not at first. A rack is useful if you pour frequently, but beginners are often better served by one reliable drying board and a lidded supply bin. Learn how much space your paintings actually require before investing in larger storage.
Acrylic pouring already contains plenty of unpredictability. Your workspace should remove the avoidable kind. Protect generously, keep the wet painting level, and make it easy to leave your pour alone. When the practical worries are handled, you can give your attention to color, movement, and the moment when the paint begins creating something you could not have planned exactly.
