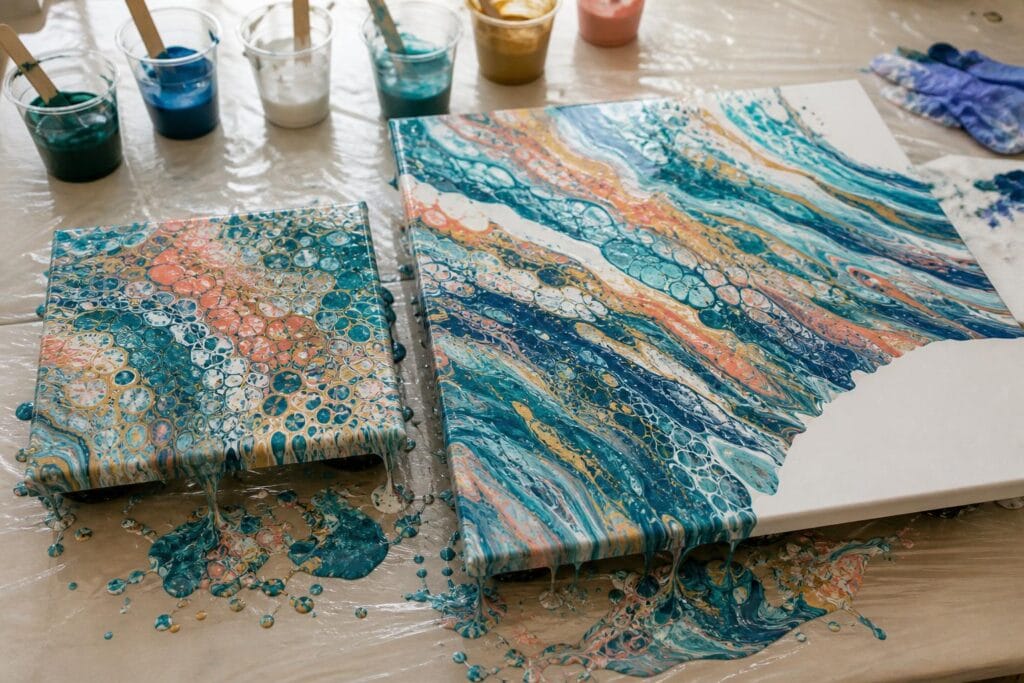
Canvas size changes much more than the amount of paint you need for an acrylic pour. It changes how far the paint must travel, how quickly you need to make decisions, how much a pattern stretches, and how easily you can reach every corner without losing the composition.
I learned this after trying to recreate a small ring pour on a much larger canvas. I multiplied the paint, used the same colors, and expected a larger version of the original. Instead, the rings opened differently, the center drifted, and I stretched several lovely details completely off the edges. The paint behaved differently because my movements, timing, and composition had not scaled with the canvas.
Why the Same Pour Behaves Differently on a Larger Canvas
On a small canvas, a slight tilt can move paint from the center to an edge almost immediately. On a large canvas, that same tilt angle may move the paint only part of the distance. You have to hold the canvas at an angle longer, which gives gravity more time to stretch cells, widen ribbons, and pull the entire design away from its original placement.
I have noticed that patterns often look tighter and more dramatic immediately after pouring on a large canvas. Once I begin covering the corners, those details can become much broader than expected. A group of delicate rings may turn into wide bands. Cells that looked perfectly round may become long ovals. This is not necessarily a failure, but it does mean the composition should begin slightly more compact than you want it to finish.
A larger surface also introduces more time between the first pour and the final tilt. The paint does not suddenly become unusable, but the earliest areas can begin settling while you are still adding paint elsewhere. If you use silicone, cells may already be forming before the whole canvas is covered. If you use a Dutch pour, the base coat can start leveling before you finish placing all the colors.
What surprised me most was how much the physical handling of the canvas mattered. A small canvas can be tilted with quick wrist movements. A large canvas often requires your arms, shoulders, and a clear plan for where the paint will travel. Even a slight twist in the canvas can send one side of the composition racing toward a corner.
How I Estimate Paint Coverage
For a standard flip cup, straight pour, or ring pour, I begin with the canvas area in square inches. I multiply the length by the width, then divide that number by 25. The result is a practical starting estimate for total fluid ounces of mixed paint, including paint and pouring medium.
An 8 by 10 inch canvas has 80 square inches. Dividing 80 by 25 gives about 3.2 fluid ounces of mixed paint. A 12 by 12 inch canvas needs about 5.8 fluid ounces. A 16 by 20 inch canvas needs about 12.8 fluid ounces.
This is an estimate rather than a promise. Deep canvas edges, absorbent surfaces, thick paint, and techniques that produce heavy runoff can require more. I usually prepare about ten percent extra and keep that portion separate. It can rescue a bare corner, but I do not automatically add it to the pour cup.
One mistake I see often is preparing barely enough paint and then tilting aggressively to force it across the canvas. The design becomes thin, cells stretch apart, and the paint may dry with uneven coverage. It is usually better to mix a modest reserve than to sacrifice the entire composition to reach one stubborn corner.
I prefer estimating by fluid volume for beginners. Weighing paint can be more precise, but paints and pouring mediums do not all have the same density. Unless every recipe is recorded by weight, a scale can create the appearance of precision without actually making the pour more predictable.
Coverage Changes With the Technique
A Dutch pour needs enough base paint to create a wet surface before the accent colors are blown across it. A swipe also depends on a generous wet layer so the swipe color can travel without scraping through to the canvas. For those techniques, I prepare the calculated coverage amount and then add extra base color.
A ring pour or traveling pour can often stay closer to the basic estimate because the colors are already distributed through the main cup. Even then, consistency matters. Thick mixtures resist movement and require more tilting. Very thin mixtures travel easily but may lose color separation or run off before you can shape the composition.
Adjusting Your Timing and Tilting
When I move to a larger canvas, I slow down the tilting but simplify the route. Randomly rocking a large canvas in every direction tends to muddy the composition and makes it difficult to remember which areas have already been stretched.
Place the canvas on a level pouring surface and confirm that you can comfortably reach every side.
Keep the initial design more compact than the desired finished composition.
Tilt toward one edge or corner until the paint reaches it.
Bring the weight of the paint back toward the center before moving to the next area.
Rotate the canvas or move your body rather than twisting your wrists at an awkward angle.
Stop when the important lines and cells still look healthy, even if a small edge needs paint added by hand.
That last step reflects a tradeoff I am happy to make. I would rather touch up a tiny bare corner with matching runoff than keep tilting until my favorite cells disappear. Perfectly untouched edges are less important to me than preserving the strongest part of the pour.
On very large canvases, several separate pour cups can create balanced areas of interest. However, I do not recommend starting there when you are learning to scale up. Multiple cups introduce more variables, including placement, timing, and where the color groups meet. One controlled pour placed slightly away from the exact center makes it easier to understand how distance and tilt affect the result.
A Side by Side Canvas Experiment
The most useful experiment I have done is repeating one recipe on an 8 by 10 inch canvas and a 16 by 20 inch canvas. The larger canvas has four times the area, which makes the paint calculation straightforward.
Choose three or four familiar colors and one pouring medium.
Mix every color to the same consistency before dividing the paint for each canvas.
Prepare about 3.2 fluid ounces for the small canvas and 12.8 fluid ounces for the large one.
Use the same color proportions and the same cup layering order.
Pour each design in a similar position and use the same basic tilting route.
Record how long coverage takes and how much paint runs off.
Photograph both pours before and after drying.
Look at ribbon width, cell shape, negative space, and how far the focal area moved. Do not expect identical paintings. The purpose is to discover how your own paint consistency and tilting style respond to scale.
Troubleshooting Larger Acrylic Pours
Why did my paint stop before reaching the corners?
You may have too little paint, a mixture that is too thick, or a canvas that is not level. Add reserved paint near the uncovered area instead of stretching the whole design until it becomes thin.
Why did my cells become long and distorted?
The paint probably spent too long traveling in one direction. Return the paint toward the center between corners, and begin with a more compact cell area. Larger cells will naturally stretch more than small ones.
Why does the large pour look emptier than the small one?
Simply multiplying the paint does not multiply the visual detail. Wider spaces need intentional placement. Try a traveling pour that crosses more of the surface, or place the initial design away from the center so the finished movement feels less predictable.
Scaling up becomes much less intimidating once you stop treating paint quantity as the only variable. Give yourself enough mixed paint, plan a simple tilting path, and expect the composition to expand. A larger canvas will not behave like a small pour enlarged on a screen, but learning its movement is part of what makes fluid art so rewarding.
